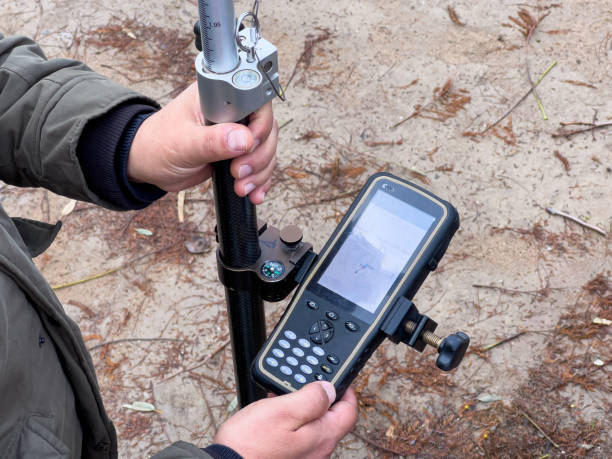
GIS data collection GNSS receiver
Selecting the right GNSS (Global Navigation Satellite System) receiver for GIS (Geographic Information System) data collection is essential for ensuring accurate and reliable spatial data. The right GNSS receiver can significantly impact the quality of data collected, the efficiency of field operations, and the overall success of your GIS projects. Here’s a detailed guide on how to select the best GNSS receiver for GIS data collection:
1. Define Your GIS Data Collection Needs
Before selecting a GNSS receiver, clearly define your data collection requirements:
- Accuracy Requirements: Determine the level of positional accuracy required for your projects. GIS data collection can range from meter-level accuracy for basic mapping to centimeter-level accuracy for high-precision applications.
- Project Type: Identify the nature of your GIS projects, such as environmental monitoring, utility mapping, asset management, or urban planning.
- Survey Environment: Consider the environments where you’ll be working, such as urban areas, forests, rural landscapes, or challenging terrains like mountains and canyons.
2. Understand GNSS Technology Options
Different GNSS technologies provide varying levels of accuracy, reliability, and ease of use:
- Single-Frequency vs. Multi-Frequency Receivers:
Single-Frequency (L1) Receivers: These are suitable for low to moderate accuracy needs (sub-meter to a few meters). They are typically less expensive and easier to use but struggle with signal obstructions and multipath errors.
Multi-Frequency (L1, L2, L5) Receivers: Provide higher accuracy (sub-meter to centimeter-level) and perform better in challenging environments. They can correct errors caused by ionospheric delays, multipath, and obstructions. - Multi-Constellation Support: Receivers that track multiple GNSS constellations (GPS, GLONASS, Galileo, BeiDou, QZSS) offer improved satellite visibility and positioning accuracy, especially in obstructed environments.
- RTK (Real-Time Kinematic) and PPK (Post-Processing Kinematic):
RTK: Provides real-time corrections, delivering centimeter-level accuracy by using correction data from a base station or network. It’s ideal for high-precision tasks but requires a reliable communication link for corrections.
PPK: Allows for high-accuracy data through post-processing, useful when real-time corrections are unavailable or unreliable. This method is effective in remote or challenging areas. - SBAS (Satellite-Based Augmentation System): Systems like WAAS, EGNOS, or MSAS provide free, real-time corrections that improve accuracy to 1-3 meters, suitable for basic GIS mapping tasks.
3. Evaluate Key Performance Specifications
- Accuracy Level: Choose a receiver that meets your accuracy needs. For basic GIS tasks, sub-meter accuracy may suffice, while high-precision applications may require centimeter-level accuracy.
- Signal Tracking Capabilities: Consider the receiver’s ability to track weak signals in environments with obstructions like dense foliage, urban canyons, or under bridges.
- Update Rate: A higher update rate (e.g., 5 Hz, 10 Hz) is essential for dynamic data collection tasks, such as vehicle-mounted surveys or when tracking moving assets.
- Multipath Rejection: Advanced receivers offer enhanced multipath rejection to minimize errors caused by signal reflections off nearby objects, such as buildings or trees.
4. Connectivity and Data Management Features
- Data Communication: Ensure the receiver offers versatile connectivity options such as Bluetooth, Wi-Fi, USB, serial ports, or cellular modems to connect with data collectors, tablets, or smartphones.
- Correction Services Compatibility: Check if the receiver supports various correction services, including NTRIP (Networked Transport of RTCM via Internet Protocol) for RTK corrections, VRS networks, and local base stations.
- Data Storage and Formats: Ensure the receiver supports multiple data export formats (e.g., SHP, KML, CSV, RINEX) and has sufficient internal storage or external storage options like SD cards.
- Cloud Connectivity: Some advanced receivers offer cloud connectivity, enabling real-time data transfer and remote management, which can streamline your field-to-office workflow.
5. Software Compatibility and Ease of Use
- Survey and GIS Software Integration: Ensure the GNSS receiver is compatible with the GIS software you use, such as Esri ArcGIS, QGIS, Trimble TerraSync, or other data collection platforms. Seamless integration improves data flow and reduces processing time.
- User Interface: Look for receivers with an intuitive user interface that simplifies setup, configuration, and data collection. Easy-to-use receivers minimize the learning curve and improve field efficiency.
- Field Data Collection Apps: Many receivers come with compatible mobile apps that offer mapping, data logging, and navigation capabilities, enhancing the data collection experience.
6. Durability and Field Suitability
- Ruggedness: Choose a receiver that can withstand tough field conditions, such as rain, dust, and extreme temperatures. Look for equipment with high IP ratings (e.g., IP67 or IP68), indicating resistance to water and dust.
- Battery Life: Ensure the receiver has a long battery life that can last through a full day of fieldwork. Some receivers offer hot-swappable batteries, allowing for uninterrupted data collection.
- Portability and Weight: Consider the size and weight of the receiver, especially if you’ll be carrying it over long distances. Lightweight, handheld receivers are preferable for mobile fieldwork.
7. Manufacturer Reputation and Support
- Brand Reputation: Opt for receivers from reputable brands known for quality, reliability, and excellent customer support, such as Trimble, Leica, Topcon, Garmin, or Spectra Precision.
- Warranty and Service: Check the warranty terms and availability of service centers. Ensure that spare parts, accessories, and repair services are readily accessible.
- Training and Resources: Look for manufacturers that provide training resources, user manuals, and active user communities for troubleshooting and skill enhancement.
8. Cost Considerations
- Budget Constraints: Define your budget, keeping in mind that higher accuracy and advanced features come at a premium. However, investing in a reliable receiver can save costs related to data errors and re-surveys.
- Total Cost of Ownership: Consider the full cost, including accessories (antennas, poles), software licenses, correction services, and potential maintenance or repair costs.
- Future Scalability: Choose a receiver that can grow with your needs, offering upgradable features like additional signal tracking, firmware updates, or compatibility with new correction services.
9. Field Testing and Feedback
- Test the Receiver: Whenever possible, test the receiver in real-world conditions similar to your field environment. This helps verify performance and compatibility with your workflow.
- Seek Feedback: Get feedback from other GIS professionals or colleagues who have experience with the GNSS receivers you are considering. Online forums, reviews, and professional networks can provide valuable insights.
Conclusion
Selecting the right GNSS receiver for GIS data collection involves balancing performance, accuracy, connectivity, durability, and cost. By carefully assessing your specific needs and evaluating the receiver’s capabilities, you can make an informed decision that ensures high-quality data collection, improved efficiency, and a successful GIS workflow. Investing in the right equipment will significantly enhance your ability to capture accurate and reliable spatial data, ultimately benefiting your projects and clients.
Steps involve in GIS data collection on field using GNSS
Collecting GIS data in the field using GNSS (Global Navigation Satellite System) receivers involves a series of well-defined steps to ensure that spatial data is accurate, consistent, and suitable for analysis and decision-making. GNSS technology allows for the precise capture of geographic coordinates, making it essential for mapping, surveying, and managing various assets. Below is a step-by-step guide on how to conduct GIS data collection in the field using GNSS:
Step 1: Define Data Collection Requirements
- Set Objectives: Clearly define the purpose of your data collection, such as mapping infrastructure, environmental monitoring, or asset management.
- Accuracy Standards: Determine the required positional accuracy based on the project’s needs (e.g., meter, sub-meter, centimeter accuracy).
- Attributes to Capture: List all the attribute data (e.g., type, condition, ID, dimensions) that need to be collected alongside spatial data.
- Scope and Area of Interest: Define the geographic boundaries of the area where data collection will take place.
Step 2: Plan the Fieldwork
- Equipment Preparation:
Ensure GNSS receivers, data loggers, smartphones, or tablets are fully charged and configured correctly.
Install necessary software or mobile apps (e.g., Esri Collector, Trimble TerraFlex, ArcGIS Field Maps) for data collection. - Base Maps and Reference Data: Load base maps, existing GIS layers, and reference data onto your mobile device to assist with navigation and data verification.
- Correction Services Setup:
Set up real-time corrections (e.g., RTK, SBAS) if high accuracy is needed.
Verify the availability of correction signals in the area, or prepare to use post-processing corrections. - Safety and Permissions: Ensure all field staff have the necessary safety gear, permissions, and access to restricted areas if applicable.
Step 3: Field Data Collection Setup
- Calibration and Testing:
Calibrate the GNSS receiver before starting data collection.
Test equipment functionality and signal reception in the field environment. - Signal Quality Check:
Ensure a clear line of sight to the sky for optimal satellite reception.
Avoid areas with obstructions like tall buildings, dense foliage, or reflective surfaces that may cause multipath errors.
Step 4: Data Collection Process
- Capture Location Data:
Use the GNSS receiver to capture the precise location of features. Depending on the device and software, this can be done by logging points, lines, or polygons.
Hold the GNSS antenna steady and at the correct height above the feature being measured to ensure accuracy. - Record Attribute Data:
Enter relevant attribute information directly into the data collection software. This could include asset type, condition, material, or any other project-specific details.
Use drop-down menus, text fields, or predefined templates to streamline data entry and minimize errors. - Capture Photos and Notes:
Take photos of the feature for visual reference, documenting any conditions or contextual information.
Record additional notes or observations that might be important for analysis or reporting. - Real-Time Validation:
Use real-time validation tools in the software to check data accuracy and completeness on the spot.
Correct any errors immediately to avoid revisits and data inconsistencies.
Step 5: Quality Control and Data Verification
- Check Accuracy and Signal Strength:
Regularly check the positional accuracy displayed on your device to ensure it meets project standards.
Verify signal quality indicators, such as PDOP (Position Dilution of Precision), to ensure data reliability. - Duplicate Measurements:
For critical points, take duplicate measurements from different positions to validate data accuracy. - Flagging Errors:
Flag any data points that seem incorrect or have poor accuracy for later review and correction.
Step 6: Data Storage and Backup
- Save Data Locally: Save data regularly on the device during field collection to prevent data loss.
- Cloud Sync (if applicable): If using software with cloud capabilities, sync data periodically to cloud storage to create backups and allow office teams to access the data in real time.
- Export Data: Export collected data in appropriate formats (e.g., SHP, CSV, GeoJSON) for further processing and analysis.
Step 7: Post-Processing (if applicable)
- Apply Post-Processing Corrections: If real-time corrections were not used or if higher accuracy is required, apply post-processing corrections using software like Trimble Business Center or GIS software that supports GNSS data.
- Review Data: Inspect the post-processed data to confirm that it meets the accuracy requirements.
Step 8: Data Integration and Analysis
- Integrate with GIS Software: Import field data into GIS software (e.g., ArcGIS, QGIS) for visualization, mapping, and analysis.
- Quality Assurance Checks: Run quality checks to identify any missing, duplicated, or incorrect data entries.
- Edit and Clean Data: Clean up data as necessary, ensuring that all collected points are correctly attributed and aligned.
Step 9: Reporting and Visualization
- Create Maps and Reports: Use GIS software to generate maps, graphs, and reports based on the collected data.
- Share Results: Share findings with stakeholders through printed maps, interactive web maps, or GIS dashboards.
Step 10: Continuous Maintenance and Updates
- Regular Updates: Schedule regular updates and inspections to keep GIS data current, especially for dynamic environments or infrastructure.
- Feedback Loop: Implement a feedback loop with field teams and users to continuously improve data collection practices and address any identified issues.
Conclusion
Collecting GIS data using GNSS receivers involves meticulous planning, systematic fieldwork, and thorough post-collection processing to ensure high-quality spatial data. By following these steps, surveyors and GIS professionals can efficiently capture accurate data, which is essential for managing and analyzing utility networks, infrastructure, and environmental assets. Properly executed GNSS data collection forms the foundation of reliable GIS databases that support effective decision-making and operational planning.
Technical guidance for Assets GIS data collection
Collecting GIS data for assets involves a detailed, systematic approach to ensure accurate, reliable, and usable data that supports asset management, maintenance, planning, and decision-making. This technical guidance outlines the critical steps, best practices, and equipment needed to collect high-quality GIS data for various assets such as utilities, infrastructure, natural resources, and public services.
1. Define Objectives and Scope
- Set Data Collection Goals: Identify the purpose of collecting GIS data for assets, such as asset inventory, maintenance planning, asset condition assessment, or spatial analysis.
- Determine Scope and Area: Define the geographic extent of data collection, the type of assets to be surveyed (e.g., roads, utility poles, pipes, trees), and the level of detail required.
- Establish Accuracy Standards: Set accuracy requirements based on asset types and project needs, such as meter-level for general mapping or centimeter-level for engineering-grade surveys.
2. Plan Data Collection
- Data Requirements: List the spatial (location) and attribute data needed for each asset type, such as dimensions, material, condition, installation date, ownership, and operational status.
- Choose Collection Methods:
GNSS Receivers: For high-accuracy location data.
Total Stations: For precise measurements, especially in obstructed or urban environments.
Mobile GIS Apps: For data entry and mapping in the field using tablets or smartphones.
Drones: For capturing aerial imagery and mapping large or hard-to-access areas. - Base Maps and Reference Data: Prepare base maps and existing GIS layers (e.g., satellite imagery, topographic maps) to guide fieldwork and provide context.
- Data Collection Protocols: Develop standardized protocols, including data formats, naming conventions, and attribute standards, to ensure consistency and data quality.
3. Equipment Preparation
- GNSS Receivers and Total Stations: Test and calibrate GNSS equipment for signal quality and accuracy. Check battery levels, software updates, and connectivity settings.
- Mobile Devices: Ensure that tablets, smartphones, or data loggers are loaded with the necessary GIS apps, base maps, and project files.
- Safety Gear and Tools: Equip field crews with safety gear, measurement tools, and any necessary permissions or access documentation.
4. Field Data Collection Setup
- Calibration and Testing: Perform calibration of GNSS devices and test data collection procedures in the field environment to verify accuracy.
- Signal Quality Check: Ensure good satellite visibility and check signal quality indicators such as PDOP (Position Dilution of Precision) to ensure reliable data collection.
5. Data Collection Process
- Capture Spatial Data:
Use GNSS or Total Station to collect precise coordinates of each asset. For linear or areal features, use the appropriate mode (point, line, polygon).
Position the GNSS antenna correctly, keeping it steady to avoid positional errors. - Record Attribute Data:
Use predefined forms in mobile GIS apps to capture attribute data for each asset, such as type, condition, dimensions, and any unique identifiers.
Use drop-down menus and predefined fields to minimize errors during data entry. - Photographic Documentation:
Take photos of assets to document conditions, surroundings, and any visible issues. Use geotagging if possible to link photos to asset locations. - Real-Time Validation:
Use validation tools within the mobile app to check data accuracy on-site. Correct errors or inconsistencies immediately to reduce the need for revisits.
6. Quality Control and Data Verification
- Accuracy Checks: Regularly check GNSS signal strength and accuracy during data collection. Verify measurements against known reference points or duplicate measurements.
- Field Inspections: Conduct on-the-spot inspections to validate the completeness and accuracy of data, especially for critical or high-value assets.
- Error Flagging: Flag any data points with questionable accuracy or missing attributes for further review.
7. Data Backup and Storage
- Local Data Storage: Save collected data frequently to the device during fieldwork to prevent data loss due to equipment failures or unexpected conditions.
- Cloud Sync: If possible, synchronize data with cloud storage or a central database periodically throughout the day to ensure backup and facilitate real-time access for office staff.
- Data Export: Export data in compatible formats (e.g., SHP, CSV, GeoJSON) for integration with GIS software.
8. Post-Processing of Spatial Data
- Apply Corrections: For high-precision data, use post-processing corrections (e.g., PPK) to improve the accuracy of GNSS-collected coordinates.
- Data Cleaning: Review and clean collected data to remove duplicates, correct formatting errors, and standardize attribute information.
- Data Integration: Import the cleaned data into your GIS software, ensuring that it aligns correctly with existing datasets.
9. Data Analysis and Visualization
- Mapping Assets: Use GIS software to create maps of collected assets, visualizing their spatial relationships, condition, and other key attributes.
- Perform Spatial Analysis: Analyze data for patterns, asset distribution, condition assessments, or to identify maintenance needs.
- Create Dashboards and Reports: Use GIS tools to create interactive dashboards or static reports that summarize the collected data and highlight key insights.
10. Data Management and Maintenance
- Centralized Database: Store all asset data in a centralized, regularly updated GIS database that supports spatial and attribute data management.
- Metadata Documentation: Document metadata, including data sources, accuracy, collection methods, and date of collection to ensure data traceability and quality assurance.
- Routine Updates: Schedule periodic updates to maintain the accuracy and relevancy of the GIS data, especially for dynamic assets that undergo frequent changes.
- User Access and Permissions: Implement access controls to protect data integrity and manage who can view, edit, or analyze the data.
11. Feedback and Continuous Improvement
- Stakeholder Review: Share data with stakeholders and gather feedback to identify areas for improvement in data collection processes.
- Training and Updates: Provide ongoing training for field staff to ensure they are proficient in using equipment and software, as well as aware of any updates to data collection protocols.
- Field Test New Technologies: Continuously explore new GNSS technologies, mobile apps, and data collection methods to enhance efficiency, accuracy, and data usability.
Conclusion
GIS data collection for assets using GNSS technology requires careful planning, execution, and post-processing to ensure high-quality, accurate data that meets the needs of asset management and analysis. By following these steps, organizations can effectively capture spatial and attribute data, create reliable asset inventories, and support informed decision-making for maintenance, planning, and operational management. Properly maintained GIS data enhances the ability to manage assets efficiently, optimize resource allocation, and improve overall service delivery.
How GIS data collector GNSS is different than survey grade GNSS ?
IS data collector GNSS receivers and survey-grade GNSS receivers are both used to capture spatial data, but they serve different purposes and have significant differences in terms of accuracy, functionality, cost, and use cases. Here’s a detailed comparison of the two:
1. Accuracy and Precision
- GIS Data Collector GNSS Receivers:
Accuracy Level: Typically provides sub-meter to 2-5 meter accuracy. Some high-end models with real-time correction services like SBAS (Satellite-Based Augmentation System) or DGPS (Differential GPS) can achieve sub-meter (0.5 - 1 meter) accuracy.
Use Case: Suitable for general mapping, asset inventory, environmental monitoring, and other applications where high precision is not critical.
Error Sources: Prone to errors from multipath effects, atmospheric conditions, and satellite geometry without high-precision correction services. - Survey-Grade GNSS Receivers:
Accuracy Level: Provides centimeter to millimeter-level accuracy with real-time correction methods such as RTK (Real-Time Kinematic) or PPK (Post-Processing Kinematic).
Use Case: Ideal for cadastral surveying, engineering, construction, and any work requiring highly precise measurements.
Error Mitigation: Advanced error mitigation features, including robust multipath rejection, atmospheric correction models, and precise ephemeris data.
2. Correction Services
- GIS Data Collector GNSS Receivers:
Correction Options: May use SBAS (e.g., WAAS, EGNOS) or basic DGPS corrections to enhance accuracy. Often, correction services are limited compared to those used by survey-grade receivers.
Limitations: Corrections improve accuracy to sub-meter but are not sufficient for centimeter-level requirements. - Survey-Grade GNSS Receivers:
Correction Options: Utilizes RTK, NRTK (Network RTK), VRS (Virtual Reference Station), and PPK to achieve high precision.
Advanced Features: Real-time corrections provide near-instant accuracy updates, and PPK offers high accuracy in areas with poor or no network connectivity.
3. Data Collection Speed and Workflow
- GIS Data Collector GNSS Receivers:
Workflow: Designed for quick, efficient data collection. Often integrates with mobile devices and GIS apps for real-time mapping and attribute entry.
Speed: Faster data collection with simplified workflows; users can rapidly capture point, line, and polygon data.
Ease of Use: User-friendly with simple interfaces, often designed for use by non-specialists. - Survey-Grade GNSS Receivers:
Workflow: More complex data collection requiring precise positioning and longer observation times for accurate fixes.
Speed: Data collection is slower due to the need for precise measurements, especially in environments with obstructed signals.
Expertise Required: Typically requires skilled operators with knowledge of surveying techniques and equipment calibration.
4. Functionality and Features
- GIS Data Collector GNSS Receivers:
Functionality: Focus on integrating spatial data with attributes, photos, and notes directly into GIS systems. Designed for compatibility with GIS data formats (e.g., SHP, GeoJSON).
Features: Often includes user-friendly interfaces, rugged design for fieldwork, and integration with mobile GIS apps.
Portability: Lightweight, handheld, and portable for extended field use. - Survey-Grade GNSS Receivers:
Functionality: Designed for high-precision surveying tasks with advanced geodetic capabilities such as staking, setting out, and boundary measurements.
Features: Advanced multipath rejection, tilt compensation, and high-frequency data logging for accurate measurements in challenging environments.
Portability: Generally larger and may require tripods, external antennas, or other setups for optimal accuracy.
5. Cost
- GIS Data Collector GNSS Receivers:
Cost: More affordable, with prices typically ranging from $500 to $5,000 depending on features and accuracy levels.
Cost Justification: Lower cost makes them suitable for organizations that need to collect spatial data without investing in high-precision equipment. - Survey-Grade GNSS Receivers:
Cost: Expensive, with prices ranging from $10,000 to $25,000 or more, depending on brand, model, and included correction services.
Cost Justification: High cost is justified by the need for centimeter-level accuracy in professional surveying and engineering applications.
6. Applications
- GIS Data Collector GNSS Receivers:
Applications:
Mapping utility networks, environmental data collection, and natural resource management.
Urban planning, land use mapping, and infrastructure asset management.
Field inspections, inventory, and data verification. - Survey-Grade GNSS Receivers:
Applications:
Land surveying, cadastral mapping, construction staking, and civil engineering projects.
Precise infrastructure placement, road construction, and monitoring ground movement.
Scientific research requiring high-precision spatial data.
7. Durability and Environmental Suitability
- GIS Data Collector GNSS Receivers:
Durability: Built for rugged field conditions with water, dust resistance, and shockproof designs. Suitable for prolonged use in varied weather conditions.
Environmental Suitability: Performs well in open and moderate environments but can struggle in areas with heavy canopy, urban canyons, or reflective surfaces. - Survey-Grade GNSS Receivers:
Durability: High-endurance designs capable of withstanding extreme weather, vibrations, and challenging field conditions.
Environmental Suitability: Superior performance in all environments, including urban areas, forests, and locations with poor satellite visibility due to advanced signal processing and correction capabilities.
8. Ease of Use and Training Requirements
- GIS Data Collector GNSS Receivers:
Ease of Use: Designed for ease of use, often with intuitive interfaces that require minimal training. Ideal for general field technicians and GIS professionals.
Training: Basic training is sufficient; no need for extensive surveying knowledge. - Survey-Grade GNSS Receivers:
Ease of Use: More complex, requiring in-depth understanding of surveying principles, GNSS technology, and data correction methods.
Training: Requires professional training and experience in surveying techniques to operate effectively.
Conclusion
GIS data collector GNSS receivers and survey-grade GNSS receivers serve different roles in spatial data collection:
- GIS Data Collector GNSS Receivers are suitable for general mapping tasks where sub-meter accuracy is sufficient. They are cost-effective, user-friendly, and efficient for quick data collection and integration into GIS workflows.
- Survey-Grade GNSS Receivers are essential for applications requiring the highest precision, such as surveying, engineering, and scientific research. Their advanced capabilities justify their higher cost and complexity, making them indispensable tools for professional surveyors and engineers.
Selecting the right type of GNSS receiver depends on the project’s accuracy requirements, budget, and the intended application of the collected data.